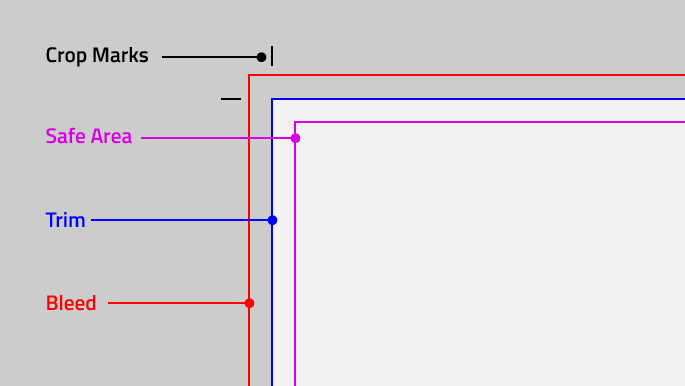
To create the best cut and trim in your printing work, you will need to create an external space outside the edge of the printing area to prevent disorganized printing. Bleed is the name for such an external space, which you need to put outside of the primary printing area.
This so-called bleed area is the space where you will need to trim later on after each printing process. The idea is to produce a neat and organized printing result for each printing work, no matter the size of the printing area.
5 Essential Benefits of Bleed in Printing
Yes, you can still print any document or artwork without applying any bleed space on your printed work, and you might still get a nice enough result out of it. However, there are some instances where you might come across certain problems in your printing process because of misalignment caused by the absence of bleed space, especially when you run large-scale book printing services. Thus, bleed has some additional benefits that can improve your printing results.
Here are the 5 essential benefits of bleed in printing:
- Create a distinct area to be trimmed. Without creating bleed space, you won’t know which areas you need to trim down after printing. So, bleed is very useful to help you determine the areas you need to trim after you print your document or artwork.
- Keep a full printing area. With bleed, you can also keep a full printing area without having to cut down any part of the printed document or artwork in the end. Bleed will provide you the empty space to trim on the outer edge of the paper while still providing you with the full printed area for your texts or images.
- Avoid misalignment in your printing work. Misalignment can often happen when you print something, whether it is a document or artwork, and it can be bad to look at. Misalignment will also worsen the quality of your printing work, which is not a good way to show your work to your customers, especially if you run book printing services. By applying the bleed space in your printing work, misalignment can be avoided at all costs, keeping your printing work tidy, neat, and organized.
- Give a neat and accurate printing result. In each of your printing work, you will need to get a neat and accurate printing result and avoid any printing errors. This is where bleed is needed in your printing work, as it will provide you with the trim area to keep your printing result neat and accurate.
- Improve the overall fidelity of the printed image. When printing an artwork, you might experience a problem of printing the image way over the designated print area. This is not good news for the aesthetics of your printed work. The good thing about bleed is that it can keep your artwork inside the print area, so you can improve the overall aesthetics and fidelity of the printed work.
4 Tips and Best Practices for Creating Bleed for Your Printing Work
In book printing services, bleed is a very important aspect in producing the best printing result for any kind of print materials, no matter the size of the paper. It will keep the printed text and artwork in a good alignment, preventing any printing errors and bad aesthetics in the printed work.
To achieve the best printing result, here are the 4 tips and best practices to create bleed for your printing work:
- Give 0.125 inch bleed area for top, bottom, left, and right of your printing paper. This is the minimum standard bleed size you need to apply to your printing paper before the printing process begins.
- Keep your text or artwork outside the bleed area. It’s always best to keep your text and artwork outside of the bleed space, unless you want to show a full-screen image on your page in the final print result. This way, you will not risk creating any weird final printing result for your texts and images.
- Extend the image slightly into the bleed area if you want a full-screen artwork. Just extend the image slightly to the bleed space if you really want to show a full-screen image in your final printing result. This way, you won’t cut too much part of the image later. It also keeps the goal of providing the full-screen version of the image as accurately as possible.
- Align the papers properly on the printer before starting the printing process. Take some time to align all the papers properly before you print anything on them, especially in the book printing services where you need to print on these papers at high speed.
Conclusion – Using Bleed to Create a Perfect Print Design
Neglecting the use of bleed will give you a higher chance of creating errors in your printing result. It’s best to follow the tips and best practices in this guide to help you maintain the best result for your printing work, which is important for both personal and business projects.